photoshop如何做网点效果教程
2022-12-25 21:55:18
来源/作者: /
己有:132人学习过
1.Open the image you want to add the linear light and halftone dot effect too.
(打开你想添加线性光与网点效果的图像)


2.Duplicatethe image to a second layer. Label the layers "original image" and"halftone layer". Move the "halftone layer" to the top of the layerswindow and make sure you have that layer selected.
(复制一个新photoshop图层,命名两个图层为“原始图像”和“中间调图层”。移动“中间调图层”至图层窗口的顶部并确定你选中了该图层。)
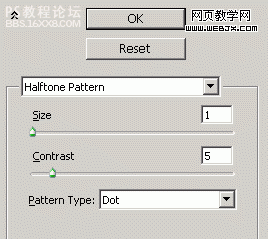
[b]3.[/b]Makesure you foreground color is white and your background color is black.With the "halftone layer" selected, select Filter Sketch Halftone Pattern from the menu bar. Use the setting in the image belowor play around some. Click "OK" when you are done.
(确认你的前景色是白色,背景色是黑色。选中“中间调图层”,从菜单栏选择滤镜 素描 半色调图案。使用下图的设置或自己设置。点击确认。)

Your image should look something like this(你的图像此时看起来应该像这样)

4.Nowwe need to invert the halftone. On a PC hold down your CTRL key andpress I, on a Mac use the Command key and press I. Your image shouldnow look something like this.
(现在我们要反转这图像。在pc上按住CTRL键同时按i,在mac苹果机上按Command键同时按i。你的图像此时像这样)

5.Almostthere, we just need to tweak the "halftone layer" some. Select thelayer and change its mode from "Normal" to "Linear Light". You can alsolowered the transparency some.
(此时已经差不多了,我们只需要调节“中间调图层”。选择图层,将图层混合模式从“正常”改为“线性光”。你也可以降低该图层的透明度)

(打开你想添加线性光与网点效果的图像)


2.Duplicatethe image to a second layer. Label the layers "original image" and"halftone layer". Move the "halftone layer" to the top of the layerswindow and make sure you have that layer selected.
(复制一个新photoshop图层,命名两个图层为“原始图像”和“中间调图层”。移动“中间调图层”至图层窗口的顶部并确定你选中了该图层。)
[b]3.[/b]Makesure you foreground color is white and your background color is black.With the "halftone layer" selected, select Filter Sketch Halftone Pattern from the menu bar. Use the setting in the image belowor play around some. Click "OK" when you are done.
(确认你的前景色是白色,背景色是黑色。选中“中间调图层”,从菜单栏选择滤镜 素描 半色调图案。使用下图的设置或自己设置。点击确认。)

Your image should look something like this(你的图像此时看起来应该像这样)

4.Nowwe need to invert the halftone. On a PC hold down your CTRL key andpress I, on a Mac use the Command key and press I. Your image shouldnow look something like this.
(现在我们要反转这图像。在pc上按住CTRL键同时按i,在mac苹果机上按Command键同时按i。你的图像此时像这样)

5.Almostthere, we just need to tweak the "halftone layer" some. Select thelayer and change its mode from "Normal" to "Linear Light". You can alsolowered the transparency some.
(此时已经差不多了,我们只需要调节“中间调图层”。选择图层,将图层混合模式从“正常”改为“线性光”。你也可以降低该图层的透明度)


